
Wiki
Kingmax GC-8700D and Juki DDL-5550N-7
Overview
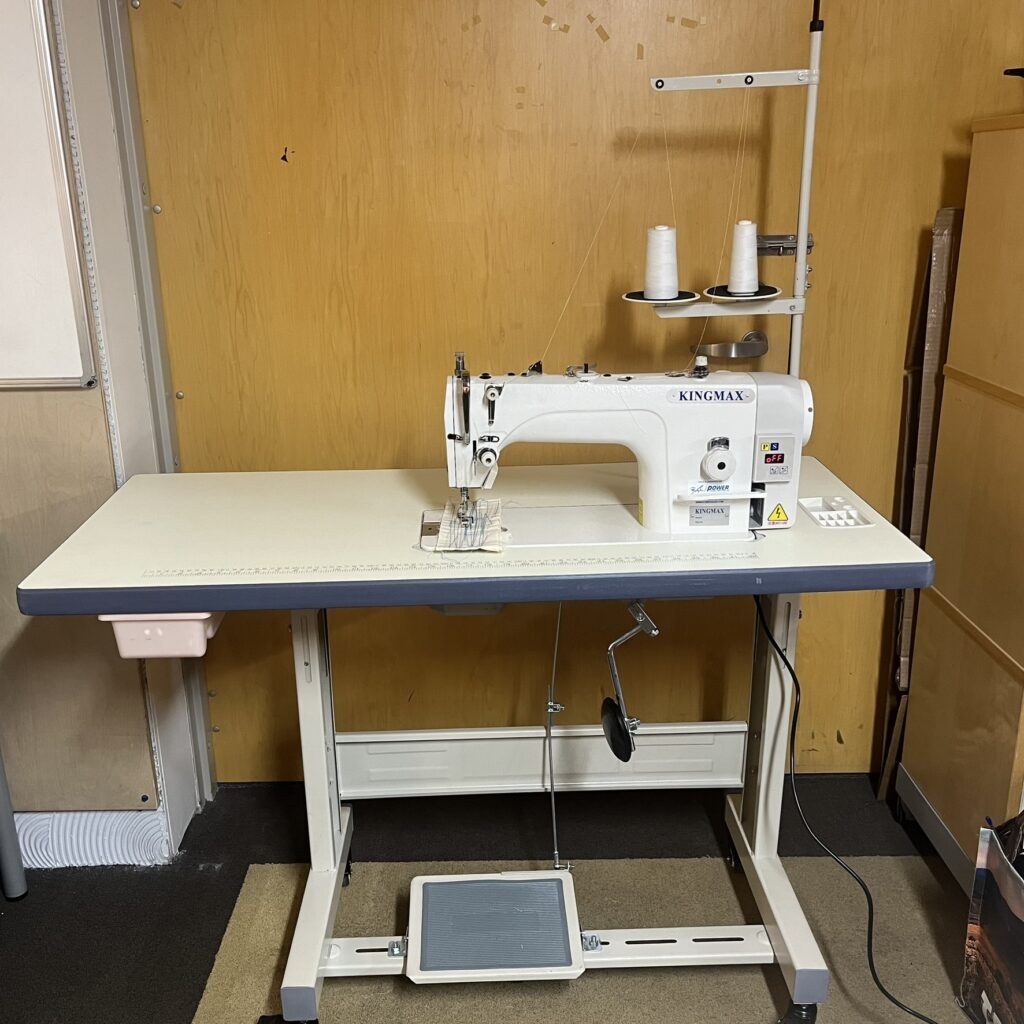
| Name | Kingmax GC-8700D, Juki DDL-5550N-7 (with CP-130 computerized elements) |
| Location | Textile Area |
| Status (Kingmax) | Operational |
| Status (Juki) | Operational |
| Training | Required |
| Slack Channel | #help-textiles-arts-and-crafts |
| Owner | denhac |
Training
The class is focused on getting you comfortable and safe operating the machines — not on teaching you to sew. It covers safety protocols, machine threading and setup, adjustments for stitch length/presser foot pressure/knee lift, bobbin winding and insertion, troubleshooting common issues, and shutdown and maintenance.
Please review the events calendar for upcoming classes, or contact via the Slack channel to schedule an in-person session.
Operation
Safety
- Do not use the sewing machine if there is visible or audible damage.
- While in operation, always keep your eye on the sewing area and do not touch any moving parts such as the thread uptake, handwheel, v-belt, bobbin winder, motor, etc.
- Keep hands away from the needle when you turn on the machine and while it is in operation.
- Turn off the machine when leaving the sewing table.
- Turn off the machine when replacing the needle or presser foot.
- Turn off the machine when threading or cleaning the machine.
- Do not attempt to sew over pins! If you are using pins, they must be removed before they reach the presser foot.
- When winding a bobbin, it is mandatory to remove the thread from the needle and hold the tail of the top thread between your fingers as the bobbin is loading.
- Always test on a scrap swatch first — especially in a shared space — and check your speed setting before starting on a real project.
- Change needles frequently. A dull or damaged needle can damage the machine, not just your fabric.
Setup
Before operation:
- Oil level check: Fill to HIGH mark using New Defrix Oil No.1. Do not operate with oil below LOW.
- Bobbin winding (if you need thread on a bobbin):
- Thread the top spool through the winder arm.
- Thread it through the small hole in the bobbin and hold the tail.
- Run the winder — you want no tail left when it’s done; it should snap on its own, or snip it if it doesn’t.
- Make sure the thread is pulled out of the needle while winding, so you don’t wind knots into the bobbin along with the thread.
- Bobbin insertion:
- There’s no single “correct” direction the bobbin has to face — once it’s seated in the case, it shouldn’t unwind on its own. Insert it into the bobbin case, and the thread will pop through the notch. Put the case into the spot underneath the machine, hinge side toward the back.
- Needle installation:
- Groove faces left, scoop faces the inside of the machine. Insert fully up.
- Common needle size is 70.
- Threading: Follow the diagram on the machine head; thread left-to-right through the needle. Refer to the printed manual on the machine — it’s always there for you. Note the Kingmax is threaded slightly differently than the Juki.
- Tension plates: Generally leave these alone. Only touch them if your stitches are coming out very tight or very loose — they’re rarely the right first fix.
- Settings:
- Stitch length: Adjust via dial.
- Presser foot pressure: Adjust via top regulator screw (29–32 mm height for general fabrics).
- Knee lift height: Standard 10 mm; max 13 mm (check needle clearance).
Usage
Starting a seam:
- Raise presser foot using:
- Kingmax: Knee lift lever or rear hand lever.
- Juki: Light back press on pedal (Auto-lifter) or rear hand lever.
- Rotate hand wheel for one full rotation, or press the automatic up/down needle button, to have the top thread bring the bottom thread up from the bobbin to the entrance of the feed dog. (This automatic button moves the needle only — the bobbin doesn’t move with it.) Pull the bottom thread tail until the end of the tail is visible. Push both tails of the top and bottom thread underneath the presser foot, toward the back of the machine.
- Position fabric and lower presser foot.
- Gently press the pedal — the machine accelerates faster than domestic models. Use the speed control to get a feel for the machine at a slower pace before sewing at full speed.
- Secure seams with reverse stitches at start/end. There are 3 ways to reverse: the reverse lever, the reverse button, or the preset automatic reverse on the Juki.
Stitching technique:
- To turn fabric mid-seam, leave the needle down in the fabric and pivot around it — use a “tripod fingers” grip to keep the fabric flat and controlled as you turn.
- Let the feed dogs pull the fabric through; avoid forcing it.
- Monitor stitch formation, thread supply, and needle threading as you go.
Automatic backstitch & thread cut:
A heavy, long press on the pedal heel triggers automatic backstitching and thread cutting. This is computer-controlled and always runs at the same speed. You won’t see a bobbin tail after it cuts. The number of backstitches (default 3) can be adjusted, and the feature itself can be turned off — check the manual for either.
Fabric-end sensors: The two buttons on top of the machine are for sensing the end of fabric — this machine doesn’t actually use that function. Ignore them.
Monitoring
- Stop immediately if abnormal noise, vibration, or oil leakage occurs.
- Check for needle bending or breakage.
- Inspect hook area for lint buildup.
- If the machine makes a significant amount of noise or any weird noises, stop using it and report it in the Slack channel.
Shutdown & Cleanup
- Power off the machine.
- Put the cover on the machine.
- Please discard all thread and any other scraps.
- If there is thread or cuttings on the floor, vacuum them up.
- Empty the trash when it gets full.
Troubleshooting
| Symptom | Cause | Solution |
|---|---|---|
| Stitches on the back side of the fabric exhibit long loops | Most likely the top thread is not securely sitting between the tension plates | Pull top thread between tension plates |
| Top thread is producing no stitches | Top thread is not wrapping around the bobbin shuttle — because the needle is either not pressed far up in the needle holder, or is facing the wrong way | Adjust the needle to the correct position |
| Both top and bottom threads are knotting on the top side of the feed dogs | Before inserting the fabric, the top and bottom threads were not pushed underneath the presser foot and toward the back of the machine | Cut threads where knotted, re-thread needle and bobbin, and position the tails of both threads underneath the presser foot and toward the back of the machine |
Accessories
Included: Needles, bobbins, bobbin case, screwdrivers, extra presser feet. There are many presser foot options — look up how to use different kinds, and you’re welcome to order and bring your own foot too.
Storage: Drawer in sewing table and metal drawer (labeled). Bobbin case remains in the machine when stored.
Materials
Suitable for light to heavy fabrics, multiple layers, leather, or vinyl.
Recommended thread size: Tex-40 — this is the most common thread used for most projects here.
Adjust needle size per material and thread (common size is 70; see manuals for full DB x 1 / DA x 1 ranges).
Industrial bobbins are a different size than the bobbins used in home/domestic sewing machines — they aren’t interchangeable.
Files & Resources
Manuals
Additional Tutorials
- Threading Kingmax (New-Tech GC 8700) – Video
- Threading Kingmax – text guide
- Introduction to Kingmax Sewing Machine
- Threading Juki
- How To Set Tension On The Juki DDL 8700/5500 Industrial
- Guide on industrial sewing machine maintenance
- Winding bobbin on Juki machine
- Overview: how a sewing machine works
Specifications
| Name | Kingmax |
| Manufacturer | Kingmax |
| Year Released | |
| Model | GC-8700D |
| Serial No. | 231050870014 |
| Software | |
| Other |
| Name | Juki |
| Manufacturer | Juki |
| Year Released | |
| Model | DDL-5550N-7 with CP-130 computerized elements |
| Serial No. | |
| Software | |
| Other |
History
- Kingmax purchased new March 2024.
- Juki purchased used July 2025.
- Both machiens last serviced January 2026