
Wiki
| Name | Snapmaker U1 |
|---|---|
| Location | 3D Printing Room |
| Status: | Operational |
| Training | Required |
| Slack Channel | help-fdm-3d-printing |
| Access | u1.inside.denhac.org |
| Owner | Denhac |
Overview
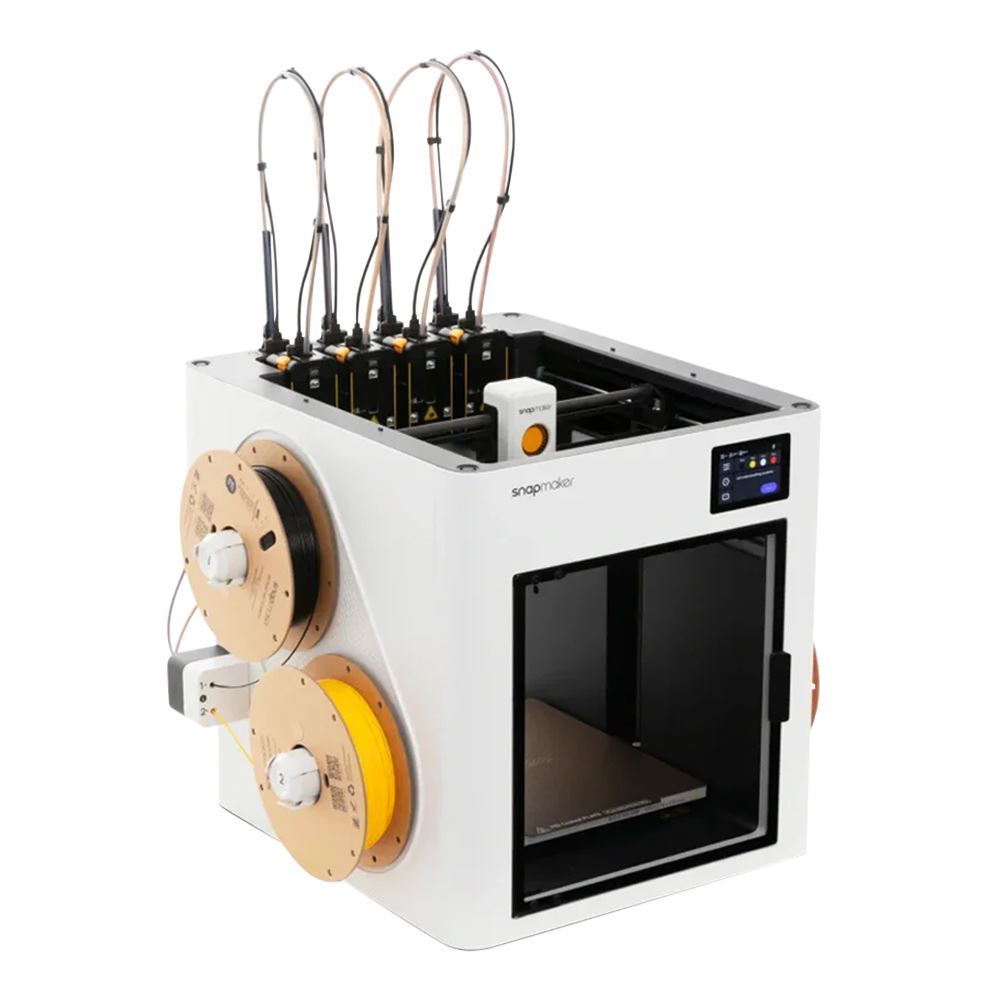
The Snapmaker U1 is a four-toolhead 3D printer capable of very low-waste multicolor and multi-material 3D printing. Denhac’s U1 was procured in April 2026. The U1 has a build volume of 270x270x270mm, making it capable of larger prints than the MK4S printers in the space while still being under the size of the XL. The printer excels at PLA, PETG, and TPU applications and though it has hardened steel nozzles, it is not to be used for printing engineering materials such as ABS, ASA, or PC as it lacks a heated chamber and proper ventilation for these materials is not achievable in the 3D printing room.
Compatibility Chart
| Material | Recommended Plate | Compatible? |
|---|---|---|
| PLA | Cryogrip or textured PEI | Yes |
| PETG | Cryogrip or textured PEI | Yes |
| TPU | Textured PEI | Yes, with caveats |
| ABS/ASA | None | No |
| PC, PA, etc | None | No |
When should I use it?
The U1 excels primarily at multi-color, multi-material operations. We would highly prefer that members refrain from printing single-color/single-material projects on it unless its larger build plate size is needed and/or the Prusa XL is unavailable at the time of slicing.
What not to do
Because of its many moving parts and its approachable touchscreen interface, jacking around with the U1 is very easy. Please:
- Do not update the firmware. If the printer notifies you of a new firmware update in the course of your use, please alert a SIG lead.
- Do not change the nozzles. We only use 0.4mm hardened steel nozzles for all of the toolheads.
- Do not pick up the toolheads with your hands or attempt to manually engage the carriage with a toolhead.
- Do not attempt to force a filament into the extruders if it is not loading properly. Alert a SIG lead or maintainer.
- Do not go into the printer’s settings menu and tweak settings. If you believe a setting needs tweaking, alert a SIG lead or maintainer.
- Do not do anything in Klipper other than controlling jobs. You may not send commands through the console, adjust settings, grant other users access, or edit config files. We unfortunately do not have a way to restrict non-administrator accounts to certain functions, so this will be operating under an honor system.
Operation
Unloading filament (non-TPU)
If there are spools loaded onto the spool holders, follow the below procedure:
- From the home screen, navigate to the filament page by tapping the filament preview, which shows four circles.
- Tap “Unloading Mode” on this screen. Select all of the filaments you want to change out using the checkboxes at the bottom. Hit Unload.
- The printer will cut the filament, partially auto-retract it, and purge each of the selected toolheads.
- Rotate each now-unloaded spool on its holder to retract the filament manually. Sometimes there will be a bit of resistance when you pull the filament out. If there is excessive resistance and you cannot get the filament to unload, please notify us in the help-fdm-3d-printing channel on Slack and tag out the printer if you can’t resolve the issue on your own.
- Remove the unloaded spools from their spool holders and tuck the filament ends into the holes on their spools. You may need to give the spools a good tug to get them off the holders depending on how snugly they fit.
Automatically loading filament (non-TPU)
To load filament into the Snapmaker U1:
- Cut the very end of your spool of filament at a 45-degree angle using the flush cutters stored in the 3D printing room. This step is crucial. Not cutting the filament end could cause the extruder to fail to grab your filament.
- Push your spools onto the spool holders. Apply firm (not too firm) pressure to the spool to ensure it locks onto the holder. If you cannot get your spool to lock onto the holder, the hole may be too small or too large; consider using another filament or printing yourself a spool adapter if possible. Take note of the numbers on the spool holders.
- Guide the end of the filament into one of the four feeder ports on either side of the printer, ensuring you insert the filament into the port labeled with the number that corresponds with the holder your filament is loaded on. You will likely feel a bit of resistance; continue to push until the white indicator light turns on and the feeders activate, feeding your filament toward the toolhead.
- Once you have fed your filament into the feeder ports, from the home screen, navigate to the filament page by tapping the filament preview, which shows four circles.
- One by one, tap the numbered circles that correspond with the filament fed towards each toolhead. In the menu that appears, select the type of filament you have inserted and the color.
- Tap “loading mode” and use the checkboxes at the bottom of the page to select the toolheads you would like to load. Hit “load.”
- The printer will push the filaments into their corresponding extruders and flush the prior filament out. Once it completes this routine, you’re ready to move on.
Manually loading and unloading filament (soft TPU)
If printing with a TPU softer than 95A, please refer to Snapmaker’s official guide when loading. There is a corresponding guide for unloading these materials.
Applying the build plate
To place the build plate on the Snapmaker U1’s heatbed, align the triangular notches in the plate’s rear with the posts toward the back of the heatbed, much as you would on one of the Prusas. Once aligned, gently lower the rest of the build plate onto the bed until it magnetically adheres.
Slicing
Up until now, our printers have all been Prusa printers primarily used with PrusaSlicer. PrusaSlicer has served us well, but it does not contain profiles for the U1. That’s why when printing with the U1, you use Snapmaker Orca (affectionately referred to hereafter as Snorca), which is a fork of Orca Slicer optimized for the U1’s multi-toolhead capabilities.
Snorca has a lot in common with PrusaSlicer, as it is a community-driven fork of Bambu Studio, which is itself a fork of PrusaSlicer. Though they share many foundational features and the same core engine, Snorca also has a lot of differences from PrusaSlicer. Some features have been renamed or moved to different pages and may not be where you expect them, and there is a wealth of features that have been added on top. Because of these differences, you will need to do your own research on optimizing your models using Snorca, but we will touch on the most important differences here.
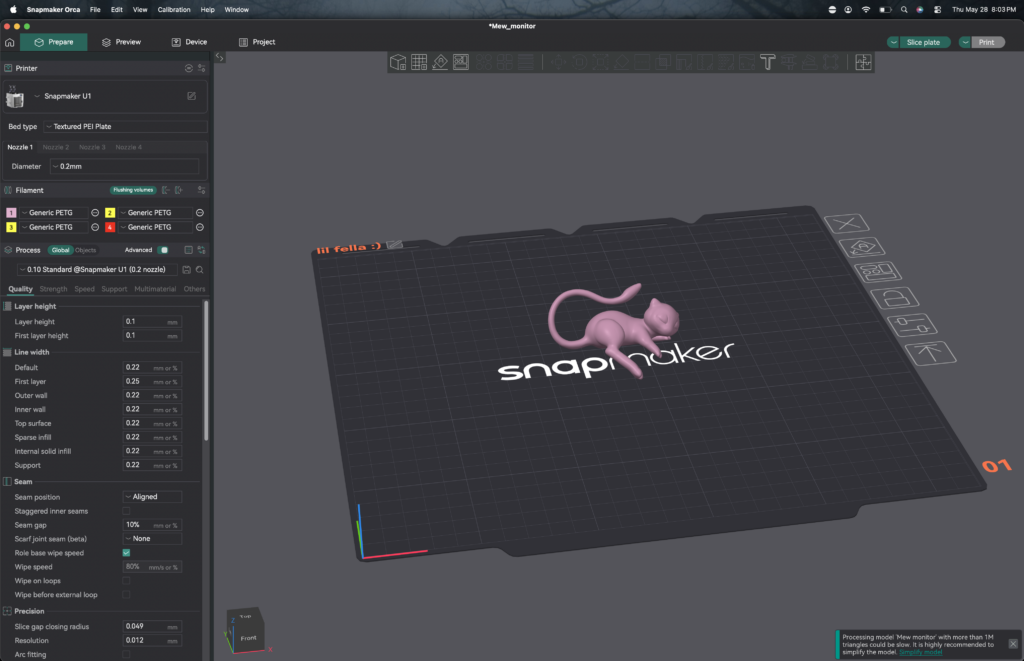
- You will need to assign your filaments to their respective toolheads under the “filament” section. For example, if you have purple PLA loaded in tool 1 and yellow TPU loaded in tool 2, but your model’s materials have the TPU set to tool 1 and the PLA set to tool 2, you will need to remap your filaments in the Objects section or within the Color Painting tool. Consider what is loaded where when setting up your file.
- Snorca sometimes likes to automatically set your nozzle diameters to values they shouldn’t be. Before slicing, please ensure you go into the Nozzle settings under “Bed Type” for each toolhead and make sure they’re set to 0.4mm.
- No LAN mode! Because we are using Klipper to send the print files to the printer, you will need to ignore the “Print” button at the top right, instead clicking on the arrow directly to its left and selecting “Export Gcode file.” This is the file you will upload to Klipper.
- If you’re not sure about anything, please ask someone!
To learn more about Snapmaker Orca, check out their official wiki page.
A note on prime towers
Due to the nature of multi-toolhead 3D printers, a prime tower is necessary when printing with multiple filaments. Please ensure yours is turned on in the slicer settings before exporting your file.
Depending on the number of color changes and the ratio of the model’s actual used filament compared to the filament required for the prime tower, you may need to factor significant additional filament usage into your planned filament consumption. Your slicer will show this to you in the Filaments tab in the sliced view.
Getting Snapmaker Orca on your personal device
You can find Snapmaker Orca at Snapmaker’s official Github repo.
Sending Jobs
As of this writing, no one has stepped forward with an easy way to connect the U1 to Octoprint. Because of this, the frontend for the U1 is its built-in one, Klipper. When authorized, you will set up a Klipper login. To send a job, log into u1.inside.denhac.org, navigate to Jobs on the sidebar, and create a folder in the root directory with your Slack handle. You can then upload a job to that folder, right-click on it, and click “Print” to send it.
Preflight checklist
Before you hit print in Klipper, please consider the following:
- Did you clean the bed?
- Did you load your filament to the toolheads? (The U1 treats feeding the filament towards the toolheads and actually loading the toolheads as two distinct things.)
- Have you assigned your colors to their appropriate toolheads in the slicer?
- Have you set the nozzle sizes appropriately? If you’re expecting a print to take 4 hours and the slicer quotes you at 12 hours, this is likely the culprit.