
Wiki
| Name | Prusa XL |
|---|---|
| Location | 3D Printing Room |
| Status: | Operational |
| Training | Required |
| Slack Channel | help-fdm-3d-printing |
| Access | xlone.inside.denhac.org |
| Owner | Denhac |
Overview
What is it?
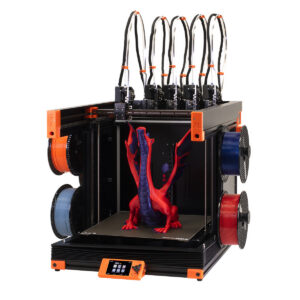
The Prusa XL is a large-format FDM 3D printer released in 2023, procured by Denhac in 2025. It takes Prusa’s Nextruder design and upscales it across five different toolheads and a large CoreXY assembly. It has a huge build volume of 360x360x360mm, making it the largest desktop-format 3D printer we have in the space.
The frame and enclosure
Our Prusa XL is outfitted with Prusa’s official enclosure. It closes in two parts, with a bellows-style magnetic cover that can be pulled up from the bottom and a transparent window frame that folds down over the top. This is excellent for protecting large prints from drafts to avoid shrinkage and warping, but be mindful of heat creep. We generally recommend leaving the enclosure open, but if you have to use it, please ensure the vent covers on the lower half of the enclosure are open.
The XL has hubs on either side with 5 ports for loading filament that each feed to a different toolhead – three on the left and two on the right. It also has numbered spool holders that can accommodate a wide range of inner spool diameters.
The carriage and toolheads
Like many other multi-toolhead 3D printers, the Prusa XL operates by locking an XY carriage to a toolhead and retrieving it from the parking area. When in a parked position, the toolheads park over a plate which blocks the nozzle and prevents oozing while the toolhead is in its lower-powered state and waiting for the next switch.
In PrusaSlicer and on the printer itself, the toolheads are numbered from left to right starting with 1 and ending in 5. On Octoprint, due to a difference in indexing, the toolheads are still numbered from left to right, but they begin with 0 and end at 4.
The heatbed
The Prusa XL’s heatbed is unique — it is a 4×4 grid of individually controllable heatbed tiles, which can be selected dynamically by the printer’s firmware to optimize its energy use and only heat the required area for the loaded Gcode file. When you start a print, it performs a heat-soaking routine by heating these selected tiles and then using that heat to passively warm up the surrounding area on the bed. Because of this, the bed heating takes a little longer than the smaller printers.
When should I use it?
If you’ve got a job that’s too big to fit on either the Snapmaker U1 and the Prusa MK4S’s, or if you want to print a multi-color job without excessive waste, the Prusa XL is the right tool for the job. Please note that using the XL still counts as using a printer with regards to the “one at a time” rule. Please don’t start a print on the XL and then start a print on another printer.
Material Compatibility
| Material | Recommended Build Plate | Compatible? |
|---|---|---|
| PLA, PLA Silk, PLA Pro, PLA-CF, etc | Cryogrip or Prusa plates | Yes |
| PETG, PETG-CF, PETG-GF, etc. | Cryogrip or Prusa plates | Yes |
| TPU (95A/60D and harder) | Prusa plates | Yes |
| TPU (90A or softer) | Prusa plates | YMMV |
| ABS and ASA | N/A | No (unsafe) |
| Whatever weird engineering filament you want to use | N/A | Ask first (probably no due to safety) |
On paper, the XL is a powerhouse for engineering/high-temp filaments, but due to their unsafe VOC emissions and our lack of proper ventilation, we do not allow members to print with such materials. Please ask a SIG lead if you have a weird filament you’d like to try and you’re not sure whether it would be safe.
What not to do
For the safety of the equipment and of yourself, please:
- Do not dive into the Settings menu and change things, and do not run the calibrations in the Control menu. Stick with the other Control settings and the Filament tab settings.
- Do not attempt to manually grab and/or pick up a toolhead from the dock or the carriage. If you need the toolhead in a different position, select “Pick/Park Tool” from the Control menu, select your tool, and then use the Move options in the Control menu to move the carriage where you want it.
- Do not use any brushes other than the silicone-bristled ones to clean the nozzles.
- Do not attempt to change out the nozzles, open the gearbox cover, or otherwise tinker with the printer.
Basic operation
Loading/changing one filament
To load filament into the XL:
- Ensure no filament is presently loaded in the toolhead. If you see a broken-off segment stuck in the PTFE tubes, please notify a maintainer or SIG lead.
- Navigate to the Filament menu. To load one filament into one tool, select the option to load that toolhead. If there is already a roll loaded into that tool, select the “change” option instead of the “load” option. Select your filament type.
- Cut the end of your filament to a 45º or sharper angle. This is vital for the material to feed into the extruder.
- Load your spool onto the holder of your choosing and route the filament through the hub whose number corresponds with the one on the spool holder.
- Continue to push the filament through the PTFE tube until it reaches the toolhead and you hear a beep. (Note: As of this writing (5/29/2026), toolhead 2 lacks the hardware to detect the filament due to an incorrectly-performed replacement of the heatsink frame. Do not be alarmed if you don’t hear the beep on this one.)
- When the beep sounds and you can feel the end of the filament stopping against the extruder inlet, click “continue” on the screen and continue to push the filament into the hub until you feel the extruder grab it. Once you feel it grab, visually confirm that the extruder is pulling on the filament and spinning the spool.
- Allow the printer to purge the hotend. If the color hasn’t fully transitioned, select “purge more” until you are satisfied and then click “yes.” Your filament is now loaded.
Loading/changing multiple filaments
The only difference in loading multiple filaments is that you will select the “change filament in all tools” option from the Filament menu, select the filaments for each toolhead one by one, and then carry out the changes. The important part is that when you click “yes” to advance to changing the next tool’s filament, the carriage will immediately whisk back to the dock with the purge line still hanging from the nozzle. Please make sure you pull this purge line off before continuing to the next toolhead.
Unloading
To unload, you can either use the same process as you would on the MK4S’s, toolhead by toolhead, or you can use the “change filament in all tools” option to switch all of the toolheads to “None,” which will tell the printer to automatically go through all five toolheads and unload each one with minimal user intervention. When the hotend has retracted your filament, you can pull the filament out from in front of the hubs.
Applying the build plate
Line the notches in the build plate up against the posts toward the back of the heatbed as you would on the MK4S. Gently lower the plate until it magnetizes to the heatbed. After doing so, please check to ensure the edges of the build plate are not making any contact whatsoever with the lead screws or rods on either side. This could damage the plate and the Z-axis or cause a print failure.
Slicing tips
PrusaSlicer is the best option for the XL thanks to its native compatibility. When printing with multiple materials, you must ensure that your filaments are mapped to the toolheads correctly. In PrusaSlicer, the toolheads correspond to the filaments in top-to-bottom order. For example, the blue Prusament PLA in the below screenshot will print on toolhead 3.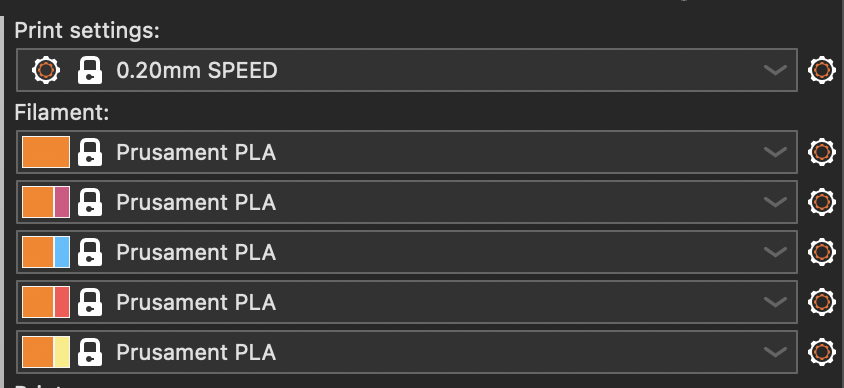
As always, it is vital that you make sure your Printer profile in PrusaSlicer is set to “Original Prusa XL – 5T 0.4 Nozzle.” PrusaSlicer contains profiles for the single-tool and dual-tool versions of the XL and these are the wrong ones to use for our printer.
Prime towers
When slicing for the XL, you will notice a big tower on your plate. This is the prime tower, a slicer feature that allows newly-switched toolheads to build up optimal nozzle pressure before they start printing on your model. Without it, multi-material prints would look terrible. For best results, try to place the tower towards the rear of the build plate so the toolheads don’t have to travel as far. If your tower breaks or comes off the plate mid-print, you will have to cancel your job to avoid spaghetti and other failures that could damage the printer.
For more info about using multiple extruders in PrusaSlicer, consult Prusa’s official guide.
Preflight checklist
Before hitting print in Octoprint, always ask yourself the following:
- Has the build plate been wiped down?
- Are your materials assigned to the correct toolheads in the slicer?
- Did you enable supports for overhangs?
- Is your prime tower on?
- Did you select the correct printer profile and corresponding nozzle diameter in PrusaSlicer?