
Wiki
Overview
| Name: Original Prusa MK4S |
| Location: 3D Printing Room |
| Status: Operational |
| Training: Required |
| Slack Channel: #help-fdm-3d-printing |
| Access: inside.denhac.org |
| Owner: denhac |

Training
Training is required for 3D Printing.
There may be a training upcoming on the training calendar, in which case you should get a ticket for that 🙂
If there are not currently any or you cannot make any of the listed trainings, feel free to make a post in #help-fdm-3d-printing and requesting to be trained. Include your general availability and 3d printing experience. We have 10+ trainers and usually run one class a week. Ideally we get 2-4 people who want training and find a time that works for everyone. Generally trainings happen on weeknight evenings or weekends. All our trainers are other members volunteering their time to teach others for free. Please pay it forward and help someone else out or improve Denhac in someway. Once you get some experience and want to help become a trainer yourself please talk to one of the trainers or make a post in slack!
Training will cover:
- Intro to 3D printing concepts, supports, reasonable infill settings
- Using PrusaSlicer from the 3d print pc (optional – install PrusaSlicer on your laptop ahead of the class)
- Walk through and have students demonstrate all steps in Machine Operation and use PrusaSlicer and OctoPrint to run a small print like this filament clip
- Getting help, reporting failed prints, printer damage – don’t attempt maintenance yourself! If you like fixing printers talk to the 3d print maintainers.
Trainers: Create OctoPrint accounts during class for trainee to use. Authorize each trainee using slack command /membership > equipment authorization.
Software
3D Modeling
3D Modeling software is used to create a digital 3D object usually saved as a .stl file. Some examples of 3D modeling software include TinkerCAD, Blender, SketchUp and Fusion 360.
This is outside the scope of denhac. We assume you’ll show up with a 3D model you want to print.
You can also download 3D models made by others from sources like:
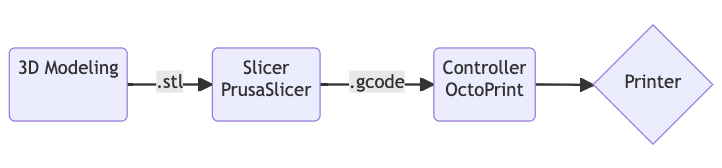
Slicer: PrusaSlicer
A slicer is software that converts a 3D model into a set of instructions for the printer saved in the .gcode format. At denhac we use PrusaSlicer.
This is where you’ll configure your speed and quality settings, setup any necessary supports, choose your infill pattern and generally set up how your model will be printed.
Installing
- Download the installer for your OS from the Drivers/Apps section from the Prusa MK4S KB page. (As of 2025-10-09, this is PrusaSlicer 2.9.3 [github releases])
- Run the installer and select PrusaSlicer.
- Running PrusaSlicer for the first time will automatically open a configuration wizard.
(ℹ) Note: You can re-run this installer at any time to change your configuration or install additional filament profiles by going to Configure > Configuration Assistant.
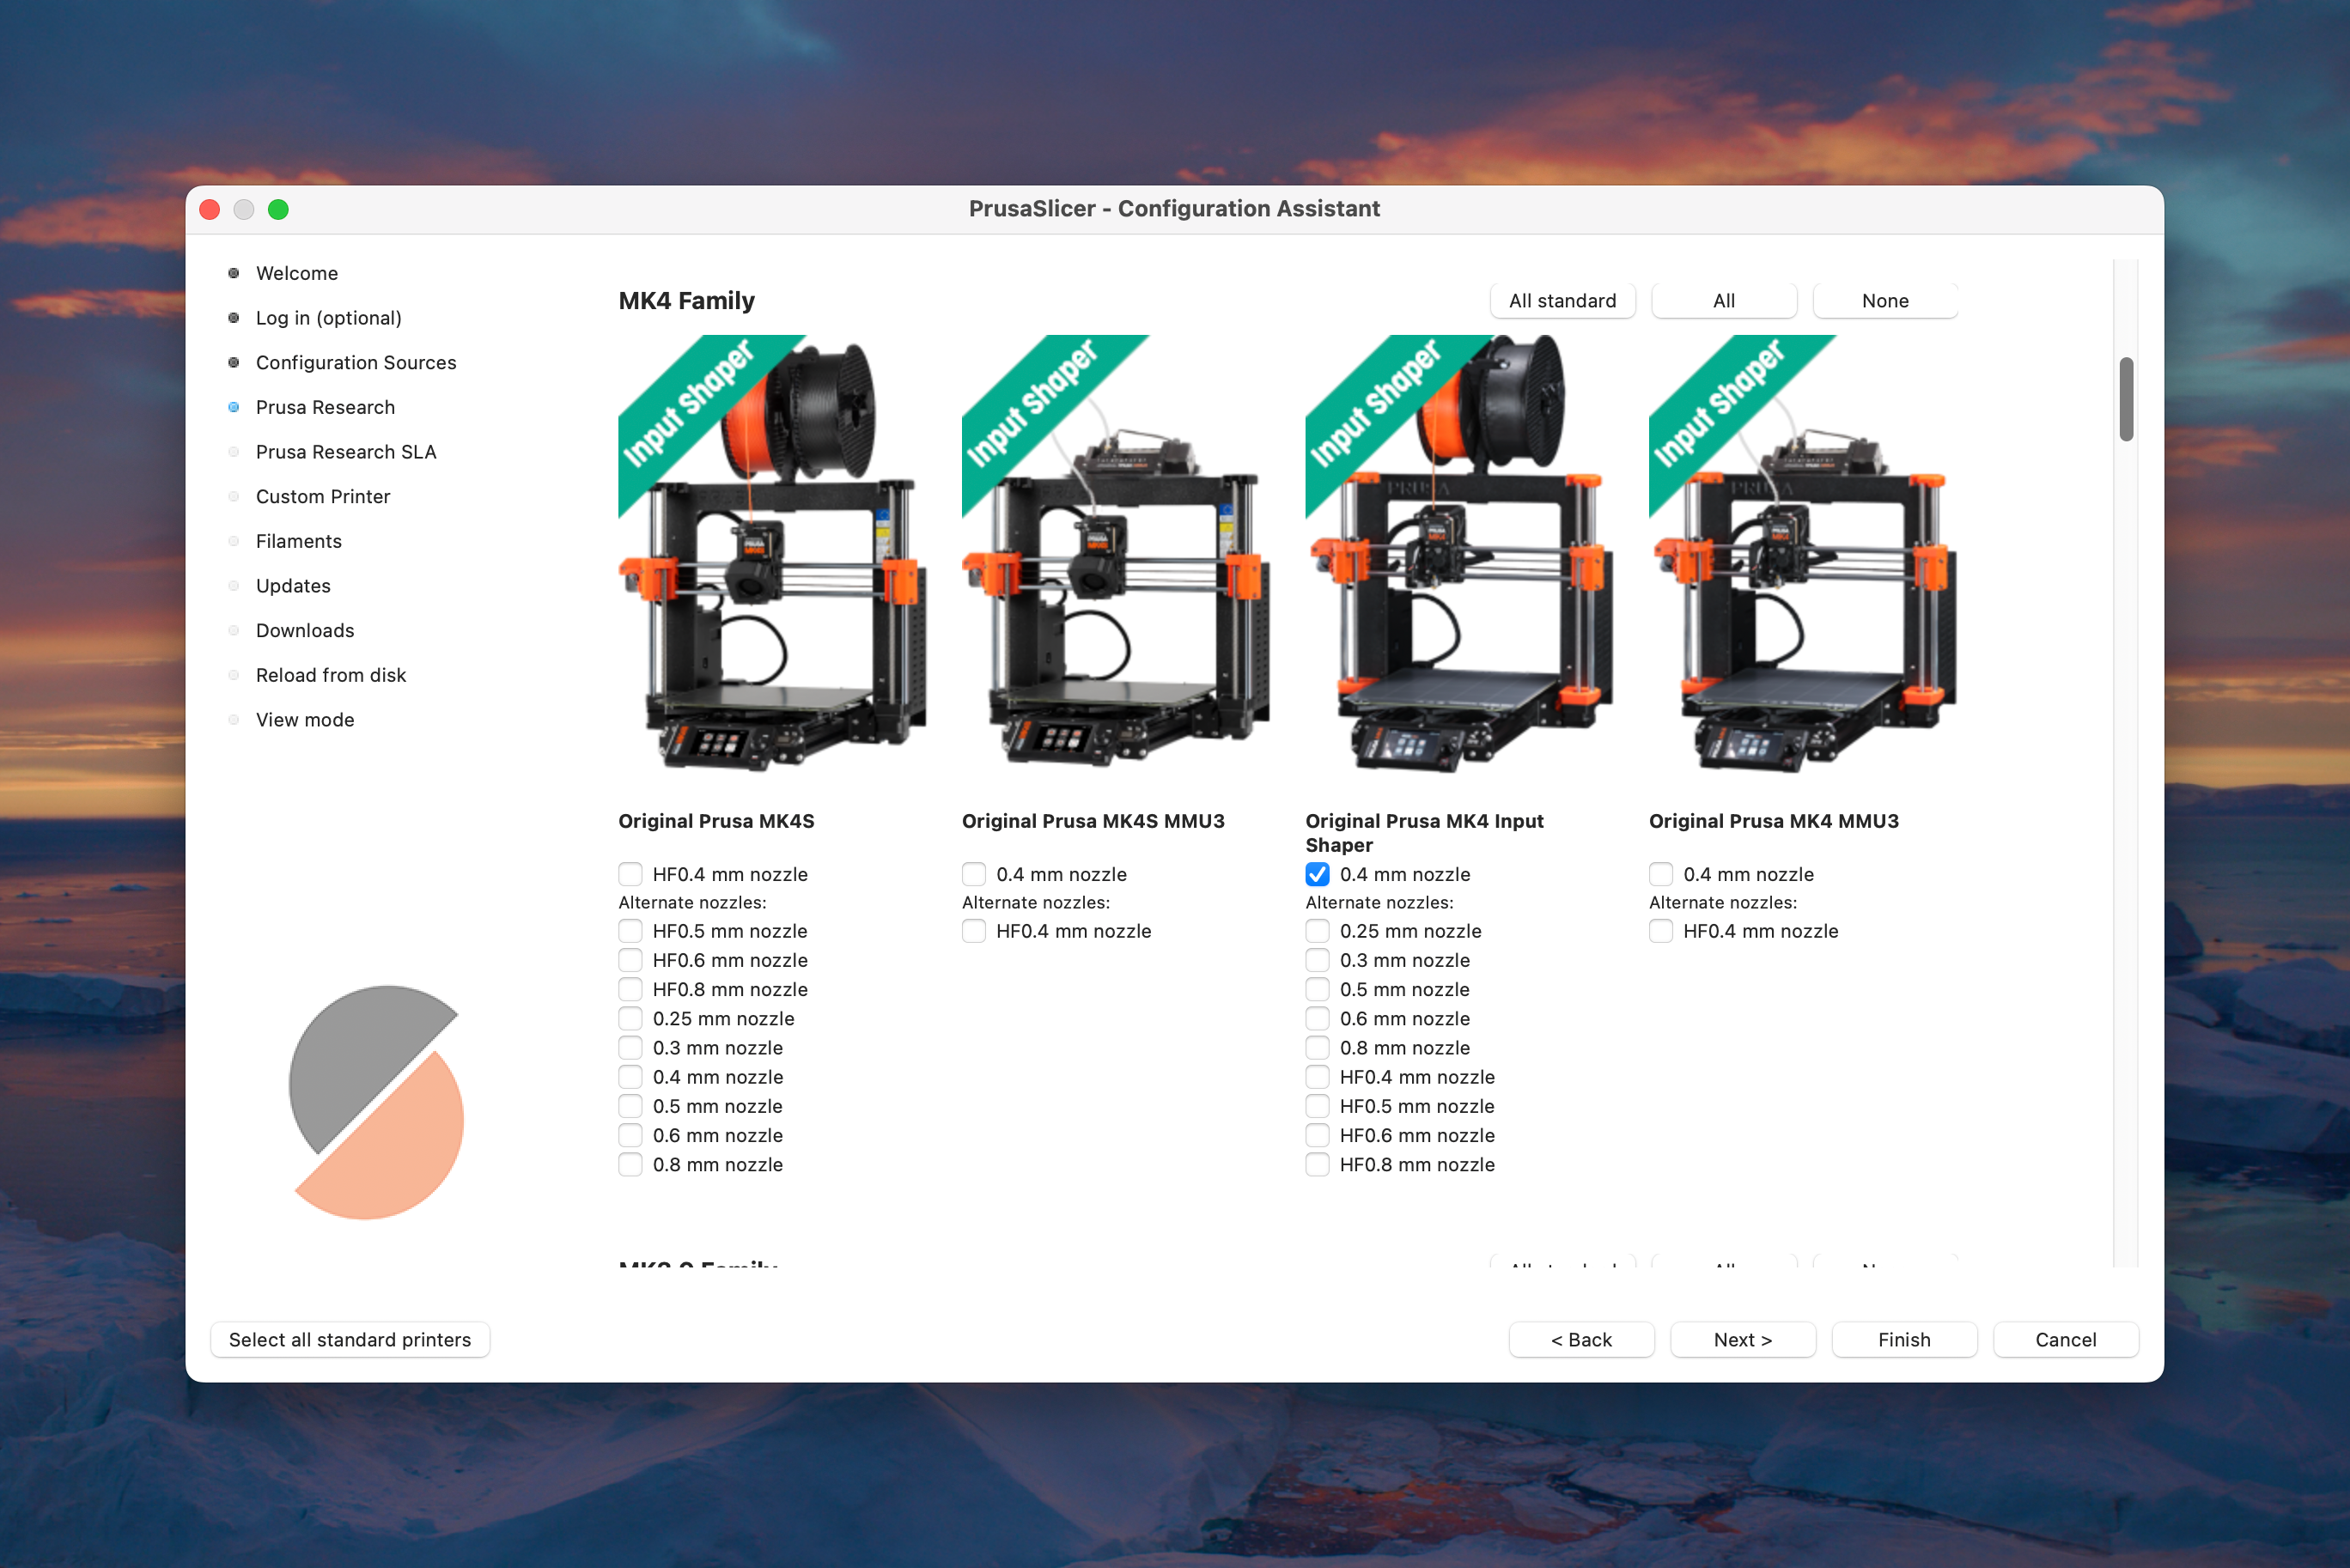
- Login to an account if you desire and select the Prusa FFF family.
- Select the Original Prusa MK4S with Input Shaper printer with the HF0.4mm nozzle checked.

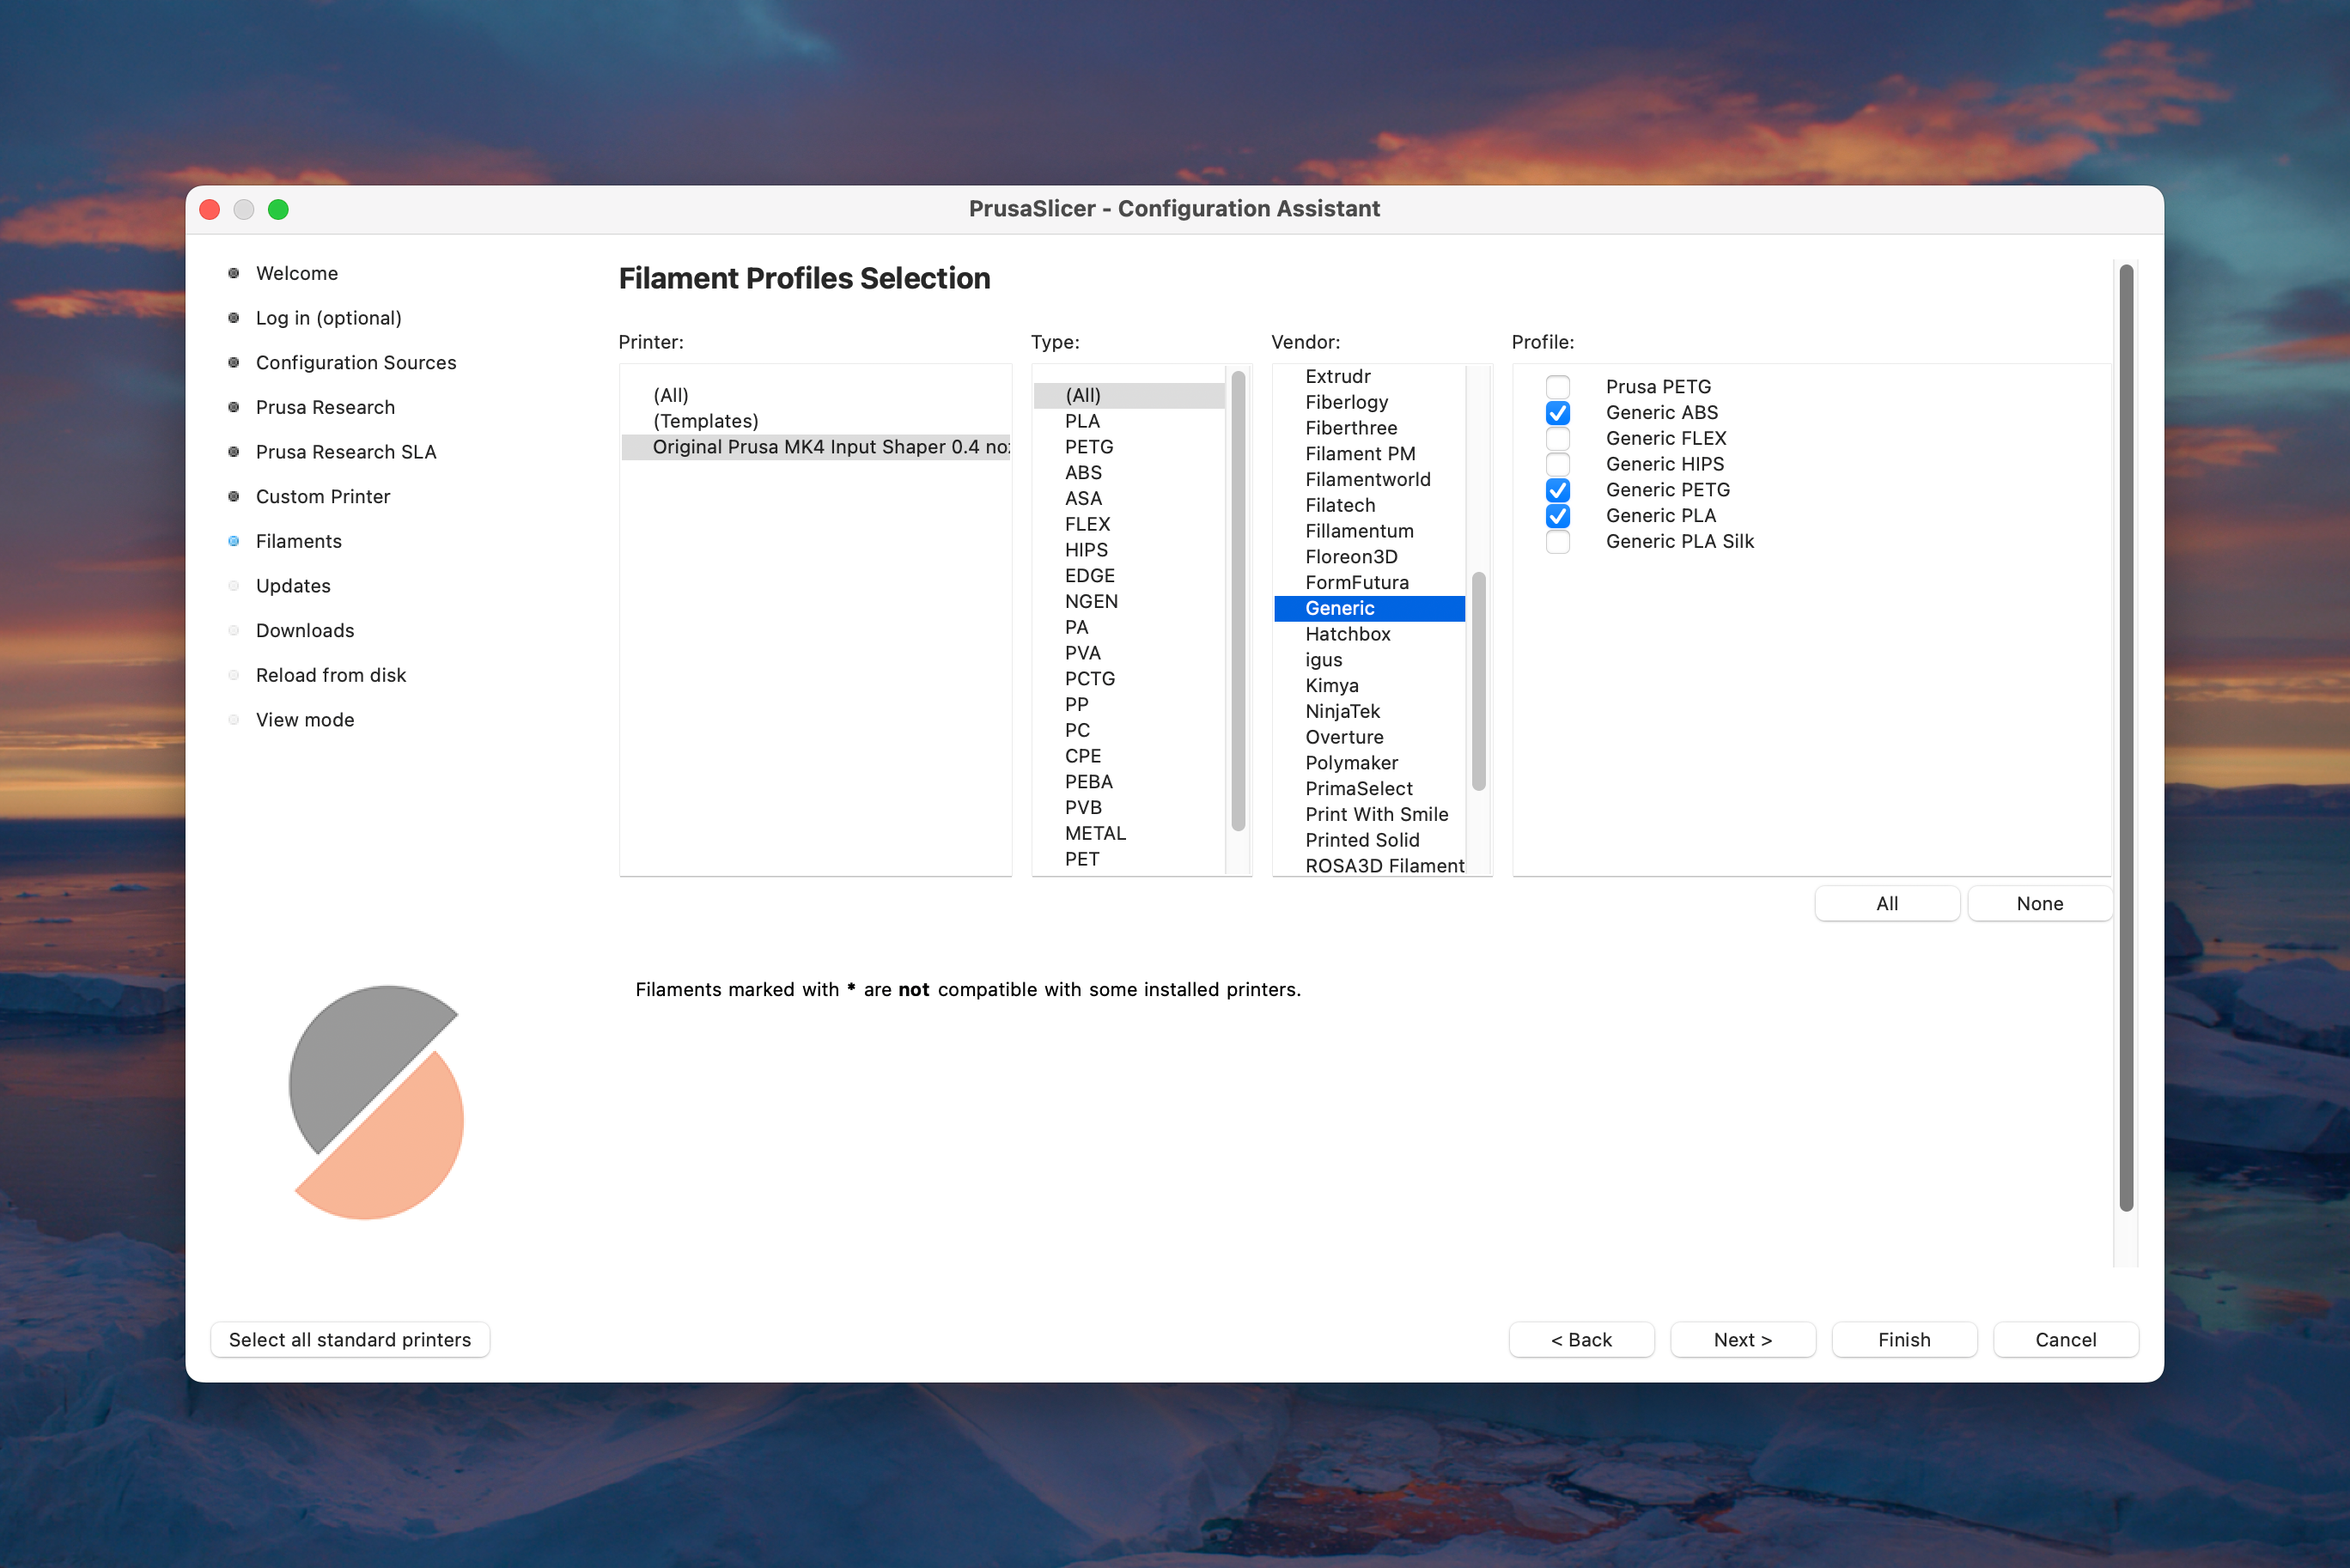
- Click Next until you get to Filaments Profiles Selection. Select the filaments you would like to work with, or click the All button to install all filament profiles.
We recommend that you check: Generic PLA ,Generic PETG, Generic ABS, and e.g. Prusament ASA. (you may wish to push the “None” button first) - You can use the defaults for the rest. Click Next until the end then click Finish.
- Lastly, you need to disable the “Use binary G-code” setting from the Configuration > Preferences > Other menu.
 Currently Octoprint doesn’t recognize this format so leaving it enabled will prevent you from being able to upload your sliced model.

Basic Usage
- Import your 3D model by going to File > Import STL.
- In the right pane choose your print settings.
- 0.20mm QUALITY is a good starting point
- Choose the correct filament
- Export to
.gcodeby going to File > Export > Export G-code
More Info
- Documentation
- [Video] PrusaSlicer Overview
- [Youtube] More video guides
Controller: OctoPrint
Controller software allows users to manage and monitor print jobs and the printers themselves and sends .gcode instructions to the printers. At denhac we use OctoPrint.
This is where you will upload your .gcode file, start and stop printing, monitor video of your print and get information on printer and job status.
You can access OctoPrint onsite at <color>prusa.inside.denhac.org once you have completed training.
Operation
Safety
- Do not touch the nozzle or the print bed unless cool. The bed may be as high as 100°C and the nozzle 255°C. Direct contact at these temperatures will result in serious injury.
- Do not put your hand (or clothing or face or anything really) in the print area as it may get pinched by the moving mechanisms or you may damage the printer components.
- Do not stick your head too close to the plate as the moving components may stab you in the eye.
- 3D printing generates fumes! If you’re going to stay in the room leave the door open to ventilate
- Do not touch the surface of the print sheet. The oils from your skin will effect adhesion.
- Do not let the preheated printer idle as it may cause nozzle to jam up.
- Do not move axes manually as you may damage the controller.
Access
Each printer is setup with OctoPrint to allow for managing the printers over the inside.denhac.org network available onsite. Access is granted at the completion of training.
Print jobs are posted on the slack #bots channel on start, cancel, or successful completion. @<color>prusa status on that channel will respond with an image of print job.
Printing with an SD card is intentionally difficult and OctoPrint should always be used.
Clean print sheet
- Ensure print sheet is cool.
- Use a scraper or credit card to remove any debris from the print sheet. Be careful not to touch the surface of the print sheet.
- Clean the print sheet with a paper towel and the correct cleaning solution for that print sheet and your chosen filament. (Some options include isopropyl alcohol, warm water and a few drops of dish soap, denatured alcohol, Windex.)
Load print sheet
- Choose and clean the steel print sheet for the printer you are using that works best with your chosen filament according to the Materials Table.
- Place the magnetic print sheet on the print bed by aligning the pins at the end of the heatbed with cut out slots in the spring steel sheet.
- Select the chosen sheet on the printer LCD. (TODO: need more detailed steps)
Load filament
- Preheat printer for correct filament type.
- Make sure that filament tip is nice and pointy and that the filament is spooled correctly. Be careful not to let the spooled filament unwrap by holding tail of the filament to the spool with your finger.
- Put the spool on the printer.
- Select autoload on LCD and select the correct filament type. (If nozzle is not preheated, select filament type from preheat menu and wait for nozzle to reach target temperature.)
- Insert the filament into the extruder and confirm loading by pressing the control knob.
- Select cool down from the LCD menu.
Printing
- Export your
.stlfile from PrusaSilcer. Choose your filament, speed and quality settings, support materials and any other desired settings and save.gcodefile. - Upload your
.gcodefile in OctoPrint in your folder (create if it does not exist) using the Load button. - Preview the print using the Center viewport and Zoom in on model option.
- When ready press Print on the left.
Monitoring
- Watch the first few printed layers to be sure filament has attached to the bed properly (5 to 10 minutes). If this is one of your first couple of prints stay for the whole thing.
- Look to make sure it is sticking well and for consistent extrusion.
- You can view job progress in OctoPrint.
Stopping
- In the event of a print failing cancel job from OctoPrint.
- In an emergency where the printer is spewing filament use the stop print command in the LCD menu to gracefully cancel. If the printer is failing catastrophically and damaging itself use the X emergency stop button.
- If you see another member’s print has failed please cancel their print using the LCD menu. Snap a pic and post in slack that you had to cancel their job. Leave the failed print on the bed. Leaving failed jobs running can cause a huge mess and damage to the printer.
Removing your print
- When it’s done, the bed will be VERY HOT. Wait for it to cool! Premature removal of print sheet can damage the your print, the print sheet and yourself.
- Remove steel sheet from printer. Be careful not to touch the surface.
- Bend steel sheet slightly. (Don’t pry.) Prints should pop off.
- Log out of OctoPrint when your job is done.
Unload filament
- Select unload from the printer LCD.
- Remove end from extruder.
- Remove spool from holder. Be careful not to let the spolled filament unwrap by holding tail of the filament to the spool with your finger then secure the end.
- Trim end at 45 degree angle then put away.
Troubleshooting
See Print Quality Troubleshooting.
Accessories
Nozzles
All of our printers now use 0.4mm hardened steel nozzles. The only exception is the belt printer, but a hardened nozzle is on order.
Print Sheets
The MK4S printers have removable PEI spring steel print sheets that attach to the print bed magnetically. This is the surface that the filament actually prints onto.
The print sheet effects adhesion of the filament printing, ease of removal of your print and the texture of bottom of the print.
There are two types of print sheets:
- Textured PEI powder-coated
- Satin powder-coated
The choice of print sheet type will depend on the filament you are printing according to the Materials Table.
Print sheets have slight variants in coating thickness which means that each sheet must be individually calibrated and saved to a steel sheet profile on each machine. It is important to select the print sheet that has been calibrated for your chosen printer.
Proper cleaning and care of print sheets greatly effect the adhesion of filament and quality of prints.
- Do not touch the surface of the print sheet. The oils from your skin will effect adhesion.
- Wait for the print to cool down completely before removing your print. Attempting to prematurely removing the print may remove material from the coating and degrade the sheet.
- Clean the print sheet before (and after) every print. The choice of cleaning solution will effect the adhesion of filament depending on material.
Materials
Filament
The most common filament’s we use are PLA, PETG (use textured bed only!), ABS, ASA. Don’t use filaments with large particles intended to be printed with nozzles larger than 0.4mm, and no nano-diamond or tungsten filled filaments in denhac printer’s. If printing with an uncommon filament please don’t hesitate to ask, with details, in #help-fdm-3d-printing.
denhac provides a variety of filament colors and materials for members to use. It’s there for members to use. If you’re printing a ton please bring your own and consider donating any extra filament for others to use. denhac is a non profit and does not exist to subsidize any business. Aka don’t try and join denhac and hog our community equipment to run a 3d print farm for your Etsy shop.
Filament Storage Policy
Members may store up to 5 labeled rolls (Slack handle + monthly sticker) in the 3D Printing area. Unlabeled or expired spools are moved to General Use via the Danger Zone racks (right corner as you enter). Top 4 racks = General Member use; bottom 4 + Dry Box = private storage. See posted policy in the room for full details.
Files & Resources
All files below are with respect to the Prusa Original MK4, found on prusa3d.com:
Printer
- Handbook v1.01 (updated: 2024-10-23)
- Product Page / Announcement blog
- Knowledge Base MK4S tag portal
Filament
- Prusa Material Table
- Glow-in-the-dark filament is safe to use.
- Filaments with abrasive additives (e.g. carbon fiber) are okay as we have hardened steel nozzles.
- Filaments with extremely abrasive additives (steel, nano diamond) are not allowed because they cause our nozzles to wear prematurely.
- When unloading filament, secure the end with a clip or by threading it through the spool holes to prevent tangling and subsequent knots and layer shifts.
Specifications
Each of these printers is an Prusa MK4 with Input Shaper
| Name | Green Prusa | Orange Prusa | Black Prusa | Blue Prusa |
| Access* | greenprusa.inside.denhac.org | orangeprusa.inside.denhac.org | blackprusa.inside.denhac.org | blueprusa.inside.denhac.org |
| Slack Bot | @GreenPrusa | @OrangePrusa | @BlackPrusa | @BluePrusa |
| Manufacturer | Prusa |
| Year Released | 2025 |
| Model | MK4S |
| Software | OctoPrint |
| Technology | Fused Filament Fabrication (FFF) |
| Build Volume (HWD) | 25×21×21 cm (9.84″×8.3″×8.3″) |
| Layer Height | 0.05 – 0.30 mm |
| Max Speed | 200+ mm/s [up to date?] |
| Max Nozzle Temp | 290 ℃ / 554 ℉ |
| Max Heatbed Temp | 20 °C / 248 ℉ |
| Top Resolution | 50 microns [up to date?] |
| Filament diameter | 1.75 mm |
Creating OctoPrint Accounts
Creating accounts right now is a manual process and must be done on each printer. Trainers should be octoprint admins and have permissions to create new users.
- Log into printer’s octoprint instance.
- Click on the “Settings” menu at the top right-hand corner of the screen.
- Select “Access Control” from the dropdown menu.
- Click on the “Add User” button at the top of the screen.
- Set same username and password, keep them the same for all printers.
- Enter the desired username and password. Leave everything else default.
When trainers authorize a new trainer, use the slack /membership command to grant trainer and also set their octoprint account on each printer using the workflow above but select Groups > Admin.
Only available onsite. Access not granted until training is complete.
Password Reset
Passwords can only be reset by an admin on-site. Post on the #help-fdm-3d-printing slack channel to request assistance and inquire about availability.
Dos and Don’ts
This is not comprehensive, nor it is a substitute for training.
- DO: Put filament spools away on the racks when done.
- DO: Put the end of the filament through the holes in the spool after unloading from the printer. Not doing so may result in knots, jams or tangles for the next person who uses it.
- DO: Put your plate away in the bed tray located between the Black and Blue printers when done.
- DON’T: Use filament on Not for General Use shelf.
- DO: Use the filament available for general use, but replace the roll or reimburse Denhac if you are printing heavily or go through a lot of a roll.
- DON’T: Continue using a printer if you see an error message. STOP YOUR PRINT IMMEDIATELY. Turn off and unplug the machine, stick a “DO NOT USE” sign on it, and notify the #help-fdm-3d-printing slack channel.
- DON’T: Use solvents other than Isopropyl alcohol on print plates.
- DO: Close the door if you’re the last one out.