
Skip to main content
Wiki
Epson V600 Film Scanner
This scanner is primarily used for scanning film photo negatives or film slide positives. It can also be used to scan documents, but really you’ll have a better time doing that with the PRINTINATOR!!
Here is the online user manual
Scanner Preparation
- Power On: There’s a green indicator light on the front of the scanner. The scanner power switch is on its right side towards the back. It uses a 14V DC Epson power supply which should always be plugged into AC.
- Software Control: The scanner is stationed at the CAD/CAM computer in the Fishbowl room.
- The “Epson Scan 2” software for Windows is already installed on this PC. Click to open the software.
- If it is unable to communicate with the scanner, click “Refresh,” try power cycling the scanner, and then reopening the software.
- It may take a few tries. Peripheral hardware specialist companies never prioritize bundling a quality user software experience.
- This scanner will work on Windows, Mac, and Linux. You can also run it on your own laptop within Fishbowl if you want to install the software yourself.
- Please don’t do this though if you’re not willing to put the scanner back fully installed at the computer. It is insufficient to “physically place it back,” it needs to be fully plugged into the denhac computer.
Scanning Film
- Prepare the scanner as directed above to get to the Epson Scan 2 application.
- This is where this scanner is awesome; it can do Negatives or Positives (which are transparent media). Printed documents and developed photographs are opaque media.
- The plastic trays will align within the frame of the glass bed and provide exact slots for your film to sit. That is where the sensor will expect to capture image data.
- Once your film is placed, close the scanner lid, because this is required to scan transparent media.
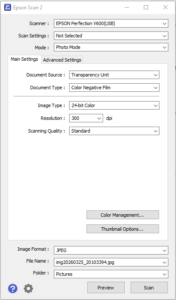
- Set the software accordingly to tell the scanner what media type you laid in the glass bed.
- Make sure the program is in “Photo Mode”, with document source “Transparency Unit” (film)
- Select the type of film being scanned in the “Document Type” field

- Select a resolution
- Higher DPI will take longer (MUCH longer for >800), and will result in a larger, higher definition file.
- Generally, 300 dpi will be fine for viewing online, 800dpi will be fine for small/medium prints up to ~15″, and higher dpi for larger enlargements.
- You can always go with a really high DPI (2400+) for a digital archive copy and then adjust it down later in photo editor software.
- Select Image Type
- Most photos work fine at 24-bit. General RGB color is 8 bits per channel (8-bpc) which gives 24-bits. This works well for digital screens like computers and phones.
- The benefit of using this particular scanner is that there is a 16-bpc option to use 48-bit color. That will limit some of the file format output options (no JPEG or PNG). If you plan to use photo editing software to adjust curves, and do clean up, and other post-processing, 48-bit TIFF is a good choice. At this point, you may end up with single image files 200MB (2 GB for 10 photos) or larger. So plan accordingly.
- Click “Preview” to do a quick scan and highlight the specific high resolution images you want to scan
- Preview can also help with adjusting the scanner sensor exposure levels to get an improved color curve for 24-bit mode. So if you’re doing a bunch of the same location on the bed, running preview each time can still help improve each new image.
- Select “Scan” to begin the high resolution scans for each highlighted frame.
- Be sure to transfer your images to your cloud, NAS, or USB flash drive and clean up the workstation. denhac computers are not for personal storage and backups. Also high quality scanned images quickly take up a lot of storage space.
Scanning Developed Photos
- Prepare the scanner as directed above to get to the Epson Scan 2 application.
- It will be similar to scanning a document. The plastic alignment trays are not used. The photo is placed directly on the glass bed, aligned to the top left corner.
- Make sure the program is in “Photo Mode”, with document source …
- Resolution
- If this is a newspaper, magazine, laser print, CD label, DVD case, etc, 150dpi will be about the maximum fidelity.
- 300-600dpi is sufficient for developed prints. There will be no benefit beyond 600 and it will take more time and more disk storage space.
- Select Image Type
- As explained in the film scanning section, 24-bit is the usual color depth. 48-bit is useful for post processing in photo editing software or archival.
- Click “Preview” to do a quick scan and highlight the specific high resolution images you want to scan
- Preview can also help with adjusting the scanner sensor exposure levels to get an improved color curve for 24-bit mode. So if you’re doing a bunch of the same location on the bed, running preview each time can still help improve each new image.
- Select the region to crop to, so that the sensor is not doing the entire bed with no photo data.
- Select “Scan” to begin the high resolution scans for each highlighted frame.